Branding a food truck or trailer: layout, menus and wraps
Updated 19 October 2026
Summary
To brand a food truck or trailer, start with a scale drawing of every side. Mark the hatches, doors, lights, vents and hinges. Place your name where people can read it with the hatch open and closed, and put your menu beside the serving window. Next, choose a full wrap, a part wrap or cut vinyl decals, depending on how much of the body you want to cover. This guide from Prodigy Graphics in Cape Town uses the Love Pizza trailer from Noordhoek as an example.
List what the branding must work around
A food truck or trailer is a mobile shop. Before you start the design, list everything on the body that the branding must work around:
- the serving hatch, and the flap or awning that covers part of the side when it is propped open
- doors, hinges, handles and locks
- lights, reflectors and the number plate, which must stay uncovered
- vents, extraction outlets, chimneys, gas bottle lockers and power inlets
- wheel arches, mudguards, the drawbar and jockey wheel
- panel joins, rivets, ridges and curves
Next, think about where people see the trailer from. They see it from the queue at the hatch, from the road while it is towed or driven, and at a market, parked among other stalls. The branding must work in all three places. People must be able to read your name with the hatch open and closed. Your name usually goes above the hatch, beside it, or on a side that the flap does not cover. You can also put branding on awnings. See the branded awning panels on the Rise and Grind coffee trailer in our event branding photos.
Make the menu easy to read
Customers read the menu from a queue a few metres away, often in bright sun. Follow these rules for a menu people can read:
- Keep it short. Group items into a few categories. Put your best-known items first.
- Use big, plain type with strong contrast, such as dark text on a light background or light text on a dark one. Do not put text over a busy photo.
- Put it beside the hatch at eye level, where the queue forms. Do not put it low down or where the people waiting will block it.
- Keep things that change off the wrap. Put prices and specials on separate boards, panels or a chalkboard. Then a new item does not need a new wrap.
- Use food photos only if they are your own sharp original photos. Blurred photos make the food look worse.
- Say what you sell in a few words, in letters large enough to read from the road. Add your social media handle or phone number for bookings.
Full wrap, part wrap or decals
A full wrap covers the whole body in printed vinyl, from edge to edge. The whole trailer becomes one large printed image. A part wrap covers one section, often the sides or the back half. The paint colour of the body is part of the design. Cut vinyl decals are letters, logos and shapes cut from coloured vinyl and applied to the paint.
| Full wrap | Part wrap | Cut vinyl decals | |
|---|---|---|---|
| Coverage | The whole body | One section, blending into the paint | Only the letters and shapes |
| Look | The whole trailer is one printed image | Printed graphics with some body paint showing | Letters and shapes on the paint |
| Artwork | Full-colour design on a template of every side | Design that matches the body colour | Vector logo and text |
| Best for | Events and markets, where the trailer is your main sign | Trailers with good paint in a strong colour | New businesses, simple branding, small extra details |
| Changing it | Re-wrap the trailer | Re-wrap that section | Replace single items |
All three options need clean paint in good condition under the vinyl. Rust, dents and flaking paint show through and can make the vinyl lift. Fix them first.
Set up the artwork from a template
A trailer is not flat, so the design starts from a template. A template is a flat drawing of every side at an exact scale.
- Measure and photograph. Take straight-on photos of each side, the back and the front. Measure the overall size and the position of every hatch, door and light. If you have drawings from the manufacturer, send them too.
- Draw the template to scale, often 1:10, with hatches, doors, lights, handles and panel joins marked.
- Design on the template. Keep text, logos and faces away from door gaps, hinges, handles, joins and tight curves.
- Add bleed around every panel, so we can fold the vinyl around edges and trim it neatly.
- Check a proof of every side, with the hatch shown open and closed.
Our guide to artwork for large format printing explains scale, resolution and bleed in more detail.
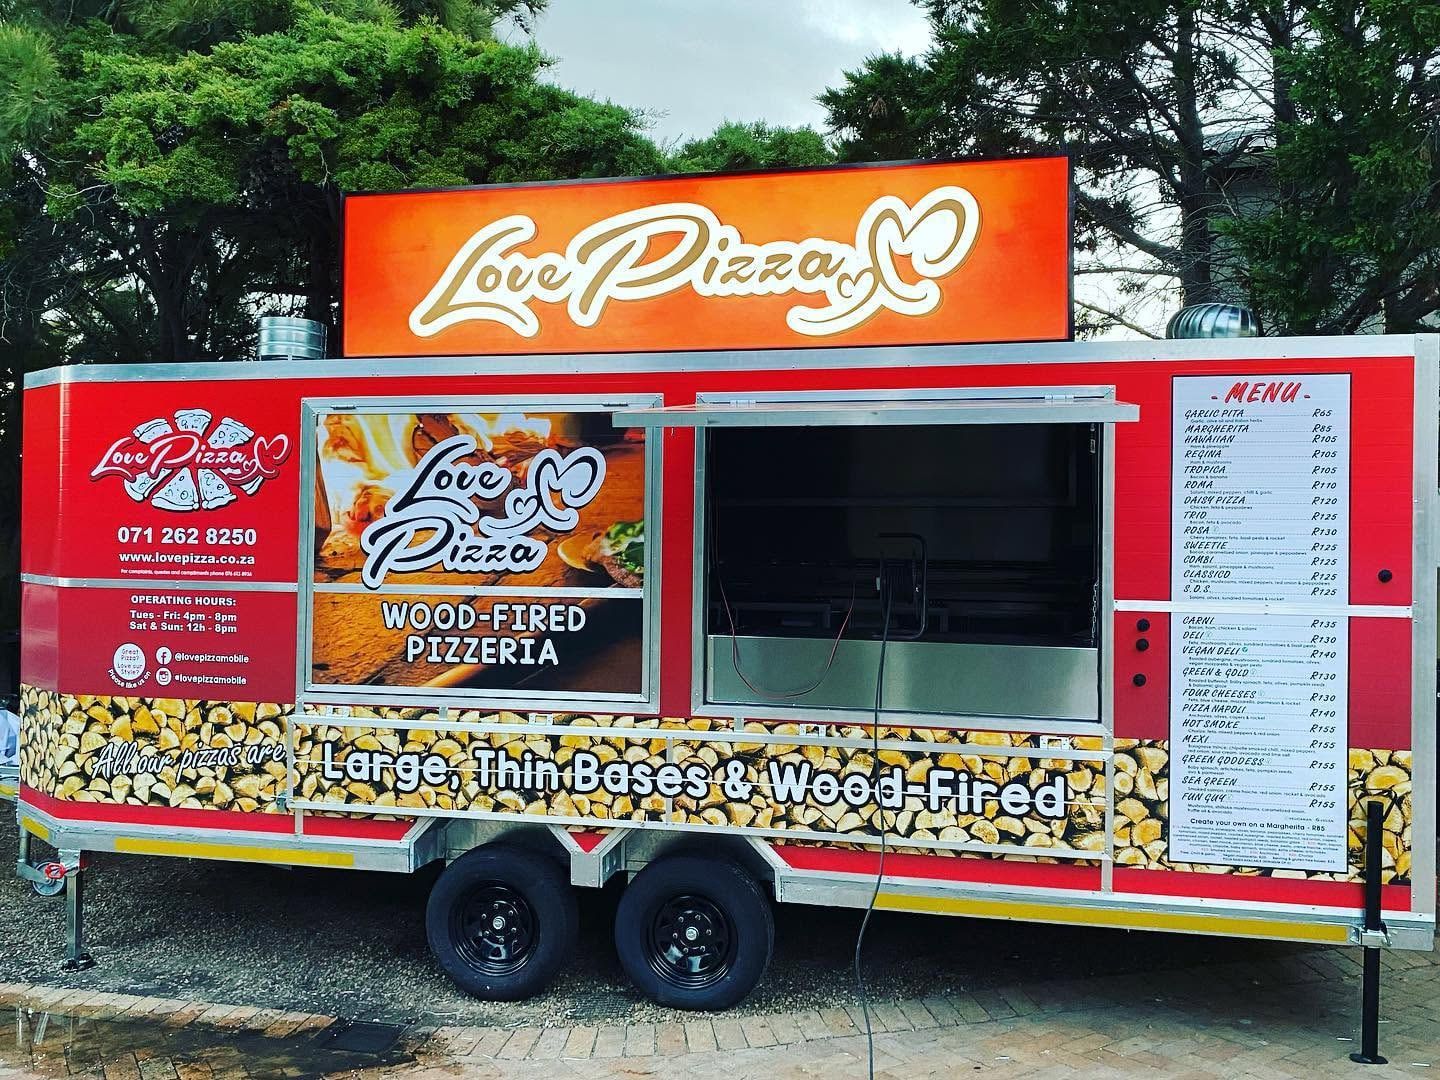
Example: the Love Pizza trailer
The Love Pizza trailer is a wood-fired pizzeria from Noordhoek. It uses these ideas:
- One strong base colour. The trailer is red, so it is easy to recognise from a distance and in a row of market stalls.
- A picture of what they make. The side has a printed picture of a pile of logs. It shows that the pizza is wood-fired, before people read any words.
- A printed menu. The wrap includes a printed menu, and the side has menu boards.
- Branding on more than one side. People can see the wrap from the rear corner as well as the side. This matters when the trailer is parked at an angle or towed.
At markets and events, a trailer is often one of many stalls. Printed teardrop flags and an A-frame menu board help people find you from across a field. You can see these beside a coffee trailer in our event photos. Read more about banners, flags and displays.
To brand your trailer, send photos of each side and the main measurements through the quote page. You can also read more about vehicle and trailer branding.